Wednesday, November 30, 2011

Garlic Lime Chicken


One of our favorite dinners is the original garlic lime chicken as seen in this video. I usually double or triple the seasonings and keep it on hand so I can make up a batch of garlic lime chicken whenever the mood strikes.

Here is the printed recipe:

Garlic Lime Chicken

(by Leanne Ely...the dinner diva)

1 teaspoon salt
1 teaspoon pepper
1/4 teaspoon cayenne pepper
1/4 teaspoon paprika
1 teaspoon garlic powder
1/2 teaspoon onion powder
1/2 teaspoon thyme
6 boneless skinless chicken breast
2 tablespoons butter
1 tablespoons olive oil
1/2 cup chicken broth
4 tablespoons lime juice

In a bowl, mix together first 7 ingredients. Evenly sprinkle mixture on both sides of chicken breasts.

In a skillet, heat butter and olive oil together over medium high heat. Sauté chicken until golden brown on each side, about 5 minutes on either side. Remove chicken and add lime juice and chicken broth to the pan, whisking up the browned bits off the bottom of the pan. Keep cooking until sauce has reduced slightly. Add chicken back to the pan to thoroughly coat and serve.
Tuesday, November 29, 2011

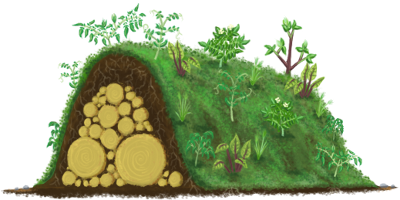
Garden #2- Hugelkultur


For our second garden, we will attempt to build a hugelkulture garden. The idea is that the piles of logs provide nutrients, drainage, and moisture to the plants. I say we will attempt it because it is ideally, 6 feet tall. I'm not sure we can come up with that many logs and sticks on our flat, mostly treeless farm. The concept makes a lot of sense though, and with our serious issues with drought, it would be worth the effort to have a garden with little to no need for rain. I guess I'm skeptical that it really will provide all the moisture needed for plants. However, that is the main point of the project..to learn about ecology and botany. The kids have formed a hypothesis about this type of garden. And I will just say that they are much more optimistic than I am. Already, they have beautiful drawings of green lush foliage with deep roots in their sketch books. My favorite quote was when Mr. C first saw this drawing. He immediately said, "Cool! The logs are the food for the plants." We also had a good discussion of our garden as it now stands (in long straight rows) in comparison to these other types of gardening that we are studying. Obviously, we won't be planting much since we are now getting freezing temperatures every night, but I suspect it will take a while to prepare the beds. After all, it is myself and 3 young helpers, plus a very "helpful" toddler. And we only will have about 30 minutes a couple of times a week to work on it during our regular science class during school. And with that, the bell has rung (so to speak) and science class is now over. Time to put away our science sketchbooks and plans until science class tomorrow.

Click the link to read more about HUGELKULTUR. It really is an interesting read. I only wish I had read it before we cleared the fence line and burned piles of trees and shrubs.

Real Life Science project


In order to have a hands on science lesson in ecology and botany, we are creating 2 gardens. The kids watched this first video and are today making a list of supplies needed and drawing sketches of the garden. They are also forming a hypothesis of what will happen in our garden. What information they do know is that the flower beds in front of our house have soil that is completely devoid of nutrients. Only long rooted weeds will grow there. Here are the resources that we have readily available.
*lots of rabbit waste
*paper/newspaper that we can recycle
*lots of decomposed cow manure in the barn
*a friend has mountains of mulch and will allow us to have some
*tools for gardening
Today is a planning/learning day and tomorrow we hope to implement the first part of the plan and lay down a layer of papers and newspapers and cover it with mulch

Saturday, November 26, 2011

My Heart is Full

A repost from my homesteading blog on Sept. 5

My Heart is Full


Rocking a sweet baby boy

Soft creaks of the old rocker

Scents of baby soap in his hair

Sweet snuggles and soft skin

Feeling cool breezes drift through open windows

On a fine fall day

Girls giggling in the background

Sweet scents wafting on the breeze

As they make soapballs

Soapballs lined up neatly

Drying in the sunshine and breeze

Whistling of the tea kettle

Cups of hot blueberry tea with honey

Scones with fresh goat cheese and raspberry jam

Crumbs on my new couch

Smiles on all

School books strewn across the kitchen table

Long division, graph paper, maps of Canada,

Mechanical pencils, and big fat pink erasers

A big girl that once was a baby in my arms

So pretty and getting all grown up before my eyes

Sewing machine waiting patiently

Fabric squares being cut

Colorful threads standing in a row

Snaggle tooth grins from a 7 year old girl

Proud of her first sewing project

Excited to sew on the sewing machine

And not by hand because sewing machines are for big girls

Sweet baby boy sleeping in his crib

Tiny eyelashes closed and fluttering

With sweet baby dreams

Arms stretched out for the whole world

Soft blanket tucked in tight

My heart is full.

Flaky Pie Crust from Scratch

Years ago, an elderly lady took several young moms aside and taught us to make a chocolate cream pie. I stared as she whipped out the flakiest pie crust ever. The really amazing thing was that she didn't even roll it out! She just took the wad of pie dough and divided it into two pie plates. She then smashed it all around the pie plate until it looked like she had rolled it out. No messy counters, no dough sticking to the rolling pin. I was in awe. So I will share with you the easiest pie crust recipe. I have adapted it by using butter instead of oil. Because butter makes everything better. Just ask Paula Deen.

Easy Pie Crust
2 c. flour
1 pinch of salt
2/3 c. butter, melted
1/3 c. milk

Stir the flour and salt together until they are well blended. Melt the butter and stir in the milk. Now dump the milk/butter mixture into the flour/salt mixture. Stir this together until it all comes together into a ball of pie dough. I have found that a fork works well for blending the liquid with the flour. You can either put half the dough into a pie plate and press it into place or you can roll it out on waxed paper. Both work equally well, with the rolled dough looking a little neater. This recipe makes 2 crusts.

Friday, November 11, 2011

Just some changes....


Well, I have finally realized that one with as many commitments as I have, cannot manage two separate blogs. I'm not really all that good at managing one blog. As seen by sporadic posting on both blogs. I have decided to combine the two blogs into one. I will probably change the name of this one to Handmade at the Farm, since most of my writing is about the things I'm making by hand, whether it's cheese, dresses, quilts, crafts or educated children. ;-) For a while I will leave up the other blog over at homesteadblogger, but will work on adding those posts into this blog as time permits. For those posts you can look over at this link so see the other things I'm up to when I'm not teaching.

Many Blessings,
Mrs. P

A Nursery of His Own


Back in August, I finally moved Baby C into a room of his own. I know that with Miss A, we had a room painted and decked out 3 months before she arrived, but Baby C is child number 4. And momma is getting old and lazy. I did not desire extra exercise in the form of running stairs at 2 am. So I did what any lazy mother would do. I stole the crib from Mimi's house and put one upstairs and my crib downstairs in my own bedroom. So at the ancient age of 1, my sweet baby finally got his own space. And I won't go into how it was my sewing nook, and technically not a real room. It has worked out perfectly for him and everyone else. Mr. C's Lego creations are safe and he doesn't have to endure the fussing and crying that babies are prone too in the middle of the night. Baby C now has a longer lifespan from having his own space that isn't full of choking hazards and pocket knives, tiny model pieces, and various other hazards that 9 year old boys are known to collect. So here is a picture of Baby C's new space.

Thanksgiving Fun on Pinterest!

Oh yes! I am ADDICTED to pinterest. It is my newest way to waste time find creative ideas. And here are a few of my favorites with a Thanksgiving theme...enjoy!!! And let me know if you need an invitation to pinterest. I would be glad to invite you.