
Monday, September 6, 2021
DIY Shampoo
I am trying out a new homemade shampoo. I used this recipe from Our Oily House, but used Argon oil instead of the Jojoba oil and also doubled the ingredients. I also used the hair loss oil blends with extra peppermint because I like how it smells. Wish me luck! My daughter is getting married in October, so I have roughly a month for my hair to get used to this new chemical free shampoo blend. I like that I already had all of the supplies on hand and did not have to make a run to the store. I hope to make the DIY dry shampoo spray (also from Our Oily Home) next, but I don't keep vodka in the house. I am wondering if maybe witch hazel might be a substitute for that. I have gotten away from using natural products with a heavy work load the past three years teaching online at the wee hours of the morning. However, due to some new education laws in China, I have found myself at the end of that job and more time to focus on the things I love like homemaking, homeschooling, my neglected garden, and more.


Wednesday, November 18, 2020

Next Week's Menu
On Wednesdays, I use a few minutes to plan out our main supper meals and start my grocery list. I usually do the grocery list online, but will often still go inside to purchase it. By making the list online, I can add and take away as needed to meet my weekly budget. Also, if like gets crazy then I can just order online and pickup when I am in town the next time. I usually do a larger shopping trip every other week, with fresh produce and milk stops in between as needed. This week, I am using all recipe from the Pampered Chef website. I love that they are often full of fresh ingredients and simple to make. Plus, I need some new ways to use the commercial steer that is filling my freezer. ;-)
Friday, November 6, 2020
Sourdough Bread Making
I ordered a new cookbook and sourdough starter from Around the Family Table. I highly recommend her for your starter. Mine is bubbling and growing nicely. The cookbook is HUGE! I mixed up her recipe fore Vanilla Latte Mix as soon as I got it and have been having this lovely treat every morning for breakfast. On the Weigh Watcher's app, it calculates as 1 point (for the almond milk) on BLUE. It really is the best homemade latte mix I have tried ... and I have tried a lot of them over the years. ;-) If you are looking at starting a sourdough or finding recipes to use with yours, try out this website because all of the recipes are amazing! I think, I will have my starter built up enough to have have spare dough for a recipe by the end of the weekend.
Around the Family Table

Thursday, November 5, 2020
I am trying out a new recipe for Boston Baked Beans from The Hillbilly Housewife website.
Boston Baked Beans
Makes 16 servings and freezes well.
- 32 oz. bag of navy beans (I am not soaking them, just sort and rinse)
- 2 teaspoons salt
- 2 teaspoons dry mustard
- 1/2 cup molasses
- 1/2 cup brown sugar
- 1 onion, peeled and chopped
- 4 to 6 oz of bacon bits (because that is what I have on hand. You can also use raw, chopped bacon ends.)
I sorted and rinsed the bag of beans and then put them into my 8 qt. Instant Pot. I covered them by about 4 inches of water. The main thing is to have plenty of water for the beans to rehydrate. I don't need them soft and fully cooked, so I chose the "bean" setting, which is 30 minutes on the Instant Pot. Let them cook and then allow the pressure to release naturally. So I set it up before I had 2 hours of online teaching, knowing It would be ready around 12:30 pm, which is perfect timing for dinner.
Drain off the cooking water. In a very large casserole (4-quart or larger) combine the semi-cooked beans, salt, dry mustard, molasses, sugar and chopped bacon. I am using my Pampered Chef 6 qt. Enameled Dutch Oven that I earned in the Fall Free for All. The deep covered baker or Rockcrok are all good choices as well. Basically a big ol' pot with a lid. ;-) Add enough hot water to barely come to the top of the beans. Put a lid on the casserole, or tin foil. Bake the beans at 300° for about 5 to 7 hours. They will be tender, fragrant and delicious. The cooked beans may be frozen in two cup portions to substitute for canned baked beans or canned pork ’n beans in any recipe. They make a good main dish, or a side dish for a large crowd. This recipe serves about 16. I make such a large amount so I can have plenty of leftovers to freeze. I am also putting Rhodes Frozen rolls out to thaw to go with them for dinner. Somehow I got my grocery list mixed up and ended up with over 60 frozen rolls in my freezer. I will serve a salad on the side and might make a pie for dessert.

Tuesday, October 27, 2020
Banana Muffins
Have you tried the soaked grain recipes for muffins? This process helps to make a softer, fluffier whole grain muffin. This recipe is one of the first I ever tried. At that time, I would make it in my Bosch Mixer/Blender. Some time after purchasing it though the blender part died. I decided to try it in my new Pampered Chef Deluxe Cooking Blender. I knew it had the power to grind the grain and it would not damage it for the batter to sit overnight.
Here is my tweak of this recipe. I want to try it with pumpkin next time.
Phase 1:
- 3/4 cup of buttermilk
- 2 T. olive oil
- 2 T. melted butter
- 1/3 c. raw honey
- 1 1/2 very ripe bananas, broken in pieces
- 1 t. vanilla
- 1 1/3 c. Pastry whole wheat berries (NOT flour. 1 1/2 c. if using other grains like spelt or kamut.)
Blend all together starting at the lowest speed and increasing to the highest speed. Let it blend for 3 minutes to be sure that all of the grain has been ground. You may have to add additional liquid to keep the batter churning for 3 full minutes. Cover blender and let it sit overnight at room temperature. If you make this in the morning for the evening, just let it sit 8+ hours and even up to 24 hours before finishing with Phase 2. This is similar to a sour dough process.
Phase 2:
Add 1 egg to the blender and hit the pulse button a time or two to blend. I actually put the leavening agents in a little cup so all I have to do in the morning is dump it in after I blend in the egg. Now add the following:
- 1 1/2 t. baking powder
- 1/2 t. baking soda
- 1/2 t. salt
Pulse a few more times to blend in the leavening agents. Now you can add walnuts or pecans if you family likes them. To ensure they are easy to remove from the muffin tins, I use paper muffin cups and then spray the muffin cups with vegetable spray.
Bake 20 minutes at 350*. Cool muffins in the pan for 3-5 minutes and then serve warm with fresh butter and honey.
Alternatively, you can use freshly milled flour and mix phase one with a wooden spoon and cover until morning. Then proceed with phase 2 and bake the next day.

Monday, October 26, 2020
This last couple of weeks, I have been working on a few canning projects. I tried a new recipe that I LOVE and want to share. Have you ever heard of Pear Honey? My husband immediately said I was not going to can all of the honey we had just harvested from the bees. It took a bit of explanation to show him that there is no honey in this recipe. In fact, it is a honey like texture and flavor but all from pineapple and pears. To make this recipe, I used my Pampered Chef Deluxe Cooking Blender on the Jam Setting. I followed the directions as listed in the recipe except, I added the crushed pineapple at the end when the blender beeps for you to add the pectin. This recipe is a sauce, so no pectin is needed. To make this an even faster recipe, I used my apple wedger to make fast work of preparing the pears. Try out this recipe if you have extra pears on hand and want to try something new. Oh, and I have some of these Wek jars in my Amazon cart. They are just too cute!
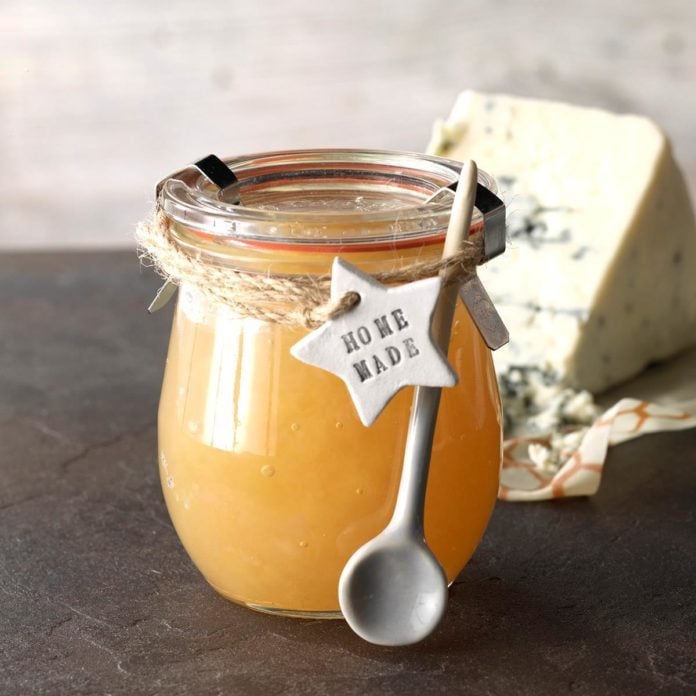
Pear Honey Recipe
Sunday, October 25, 2020
We have been reading through the Psalms for our devotion time. I love this arrangement of Psalm 138. Here is a link to Charles Spurgeon's commentary on this particular Psalm. I shared this with my Classical Conversations students as well. In light of the many challenges of 2020, we discussed the many difficult years that humanity has survived this world. We talked about times of war such as World War I, World War II, times of hunger such as the Great Depression and times of sorrow and loss such as the many children who were moved to the country during The Blitz, but never were returned home to their families in England. We also talked about all of the difficult times that had occurred before David wrote this Psalm and how we can trust the Lord and Praise HIM even during difficult times. We can even thank HIM during difficult times as He will use them for a greater good even though it may not seem possible during the challenging times or times of sorrow. So today, I challenge myself to life the Lord above every thing and trust HIM to increase my strength of soul rather then relying on my own abilities, which are always lacking.
Saturday, October 24, 2020
Weekly Menu Plan with a list of things to prepare over the weekend

We are working to trim up a bit and get back to eating a healthy and more traditional foods diet. Here is my menu for the week. I will be using up a few things from the pantry that are processed, but I am trying to keep that to a minimum. I also will use some of the honey we harvested as well as pecans that are ripening on the trees.
Weekend Prep:
1) Make Skim Milk Yogurt
2) Boil a dozen eggs in the electric pressure cooker
3) Make a whole chicken/chicken broth
4) Make Apple Snap Granola
Breakfasts:
Yogurt Smoothies
Air Fryer Eggs & Bacon or Sausage
Yogurt and Apple Snap Granola
Cottage Cheese w/fruit
Scrambled Egg Wraps
Boiled Eggs
Overnight Oats
Lunches:
Chicken Salad
Homemade Lunchables w/ Ak-Mak crackers (minimally processed)
Meat Patties w/Cauliflower & Carrot Puree
Salmon Patties, steamed peas, sautéed squash
Dinners:
Sesame-Orange Chicken with Arborio Rice
Taco Tuesday with lettuce, Pico de Gallo, tomatoes, cheese, sour cream, black olives
Chicken, Wild Rice, and steamed broccoli
Tarragon-Dijon Meatballs with Garlic-Tarragon Gravy, Sweet Potato Wedges, Green Beans
Korean Beef Bowl with Brown Rice
Sunday, October 18, 2020

Wednesday, July 3, 2019
Kefir Cornbread (Cultures for Health)
I have a fresh bottle of kefir and will try out this lovely homemade cornbread recipe to go with our beans. For most of the family, this will make the Beans & Cornbread meal a XO (crossover= mixture of fats and carbs, not as conducive to weight loss). This is the one thing I love about the Trim, Healthy Mama plan. She does not eliminate any food category. You will still eat some whole grains. You will still eat healthy fats. You can still eat fruits! I love that you can even have dessert! I read that the sisters who wrote it just learned that by eating whole grains without fats they were able to continue their weight loss. I love this balanced approach. I especially love that it means I can make ONE meal for everyone. Want to lose weight? Just skip the cornbread today or have a tiny piece to keep your fat below 5 grams. Want to feed hungry kids? Just serve them both with some honey and butter. YUM!
Back a long time ago, I had a herd of dairy goats and for a time a Jersey Cow that I milked every day. I used to make the kefir from scratch with the kefir grains that our local goat dairy gave me. It is probably the easiest fermented food you can make. However, since I don't have any cows or goats "in milk" I have been buying some unsweetened kefir at the local store. If you have used buttermilk for baking, this is very similar. Buttermilk is also SUPER easy to make. This reminds me that I still need to schedule an easy cheesy cheese making workshop. Who would like to learn to make some easy cheeses? I have a pregnant Jersey cow ambling around the pasture now, so I may be back in the dairy business this fall!

Tuesday, July 2, 2019
Fruit Harvests
Today I will be picking, washing, and preparing fruit for canning, juicing, and freezing. I spent the morning picking blackberries and peaches. The blackberry bushes have been neglected and I missed a lot of fruit with our crazy summer schedule. I picked about a gallon baggie full of blackberries. I plan to freeze them and then later, when I have 4 gallons, I will juice them for jelly. Freezing blackberries is simple. Just wash them and freeze in a single layer on a cookie sheet. This will keep them from sticking together and you will be able to pull out a cup or so for a recipe/smoothie/etc. However, if you know you are just going to be making jelly or jam later, you can freeze them in freezer boxes. I will probably do the boxes for this batch, since my freezer is so full of the beef we just got from the butcher. Right now I have to work with what I have available. T
The peaches are overflowing. Two trees are fully ripe with two more full of green and unripe peaches. I usually make jam, but I may resort to juicing and canning for jelly at at later time. I would love to freeze them, but I do not have enough freezer space. I will teach Miss J to can a few quarts for pies and cobblers. I hope they turn out well so she can enter them into the fair. Last year she got a rosette for her Caramel Apple Pie filling. We have one quart jar left and no one wants to eat the last jar. We keep saving it for a "special day." I guess we need to make another batch of that too! Here are a couple of recipes that I am looking at for the peaches! I have a nice stock of dark honey so I plan to try it on at least one batch of the jam to see if we like it.
Honey Sweetened Vanilla Peach Jam
Honey Peach Preserves

Here is a LOVELY pdf of a vintage Ball Canning Blue Book. The ladies on the front appear to be wearing clothing from the 1920's. There are several recipes that are appealing in this pdf. I also love the simple directions on canning at the beginning. What is your favorite way to preserve your harvest? Freezing, canning, dehydrating?
The peaches are overflowing. Two trees are fully ripe with two more full of green and unripe peaches. I usually make jam, but I may resort to juicing and canning for jelly at at later time. I would love to freeze them, but I do not have enough freezer space. I will teach Miss J to can a few quarts for pies and cobblers. I hope they turn out well so she can enter them into the fair. Last year she got a rosette for her Caramel Apple Pie filling. We have one quart jar left and no one wants to eat the last jar. We keep saving it for a "special day." I guess we need to make another batch of that too! Here are a couple of recipes that I am looking at for the peaches! I have a nice stock of dark honey so I plan to try it on at least one batch of the jam to see if we like it.
Honey Sweetened Vanilla Peach Jam
Honey Peach Preserves

Here is a LOVELY pdf of a vintage Ball Canning Blue Book. The ladies on the front appear to be wearing clothing from the 1920's. There are several recipes that are appealing in this pdf. I also love the simple directions on canning at the beginning. What is your favorite way to preserve your harvest? Freezing, canning, dehydrating?
Saturday, June 22, 2019
Freezer Meal Survival
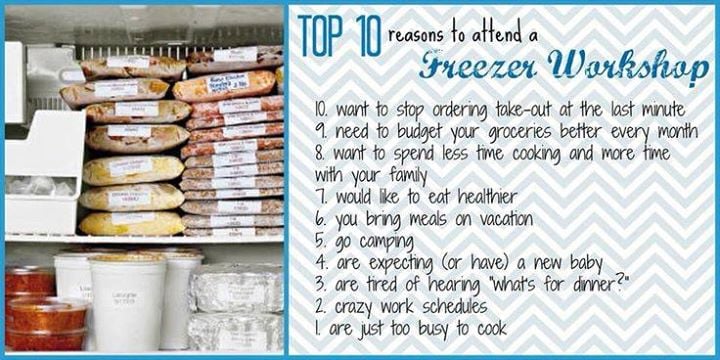
Hello! Life has been busy with all of the teen kids. I really thought I was tired and busy when everyone was toddlers, but how mistaken I was. This new season of mom as a taxi driver is a different kind of busy...and of course I have my tag-a-long littles to round out the fun. This week I was taking little kids to swimming lessons each day. I finish up my VIPKID classes at 9:15, classes start at 10 and it is about a 25 minute drive to town. So each morning, I pretty much cross my fingers that the little kids (ages 8 and 6) have gotten dressed and grabbed a quick breakfast that I laid out. I also am using the driving time to let my 15 year old practice driving. 2 licensed drivers, 1 in training, and 2 to go. I think I might be getting too old for this driver's ed thing. ;-) Anyway, as I have had such full mornings, I am relying on my slow cooker to survive this summer. How do you beat the drive through temptation?
I became a Pampered Chef consultant about a year ago and the one "party" that is my favorite is the Freezer Meal Workshop. Of course, I had to try out a menu plan before I could offer it to my friends. It has literally been years since I did regular freezer meal preparations and I had forgotten how nice it is to have food in the freezer. In the workshops that I hold now, we usually prep one to two weeks of freezer meals in about 2 hours. I run around and wash dishes and Pampered Chef gadgets. I keep trash bins empty and offer help as needed. During the next week or so they can opt to cook their meals in the slow cooker, microwave (25 minutes!!!) or even pop it into the oven. It has been so much fun to help other people get their freezers stocks and ditch the drive through.
Tuesday, June 27, 2017
Tapestry of Grace for Large Families (and small)
This morning I am finishing up training to become an advisor for Tapestry of Grace. I think maybe I should do this each year just to get so inspired listening to Marcia Somerville share the curriculum that she wrote. If you have not heard of Tapestry of Grace, check out these links to learn more about this unique curriculum that is a fantastic classical, humanities program. What is the best part? The best part is that when you purchase the curriculum it includes lesson plans and teacher notes for grades K-12. That means that every child in my house is all studying the same time period in history. This has saved me so much time in planning since I sort of camp out in the older kid's teacher notes section, which then has me prepared for teaching all the levels at my house. This year I will have a K4, 2nd grader, 8th grader, and 10th grader. This is our 4th year to use Tapestry of Grace and because of this whole family approach, I will own almost all of the books and all of the curriculum and supplements after this year. So as I have slowly purchased books to go along with the curriculum (and utilized the library as well) I have invested and now have a program for my whole family for the rest of their homeschool years. I can't even begin to tell you how many books I purchased over the first 10 years of homeschooling, that were never reused and were consumable. Anyway, for our family, it has been a great fit and so rich and rigorous. Below are the 4 years of Tapestry of Grace. Click the Explore Tapestry link to see short videos and get a great overview of how the curriculum is set up. It includes many of your homeschool subjects and you will just add in math, science, and language. It does include an excellent writing program that follows their method of "Read, Think, Write" approach which works so well in helping the children to interact with the history and an in-depth literature analysis program using the great books. One last point is that the curriculum is designed so that you can begin anywhere in the history cycle and designed so that you can be flexible. We began with Year 3 and this year will complete our first cycle of history with Year 2. Flexibility is the heart of this program, so check it out if you want to simplify your school by having everyone on the same page.


Explore Tapestry
You can explore more here and see a sample of the curriculum to try before you buy.
Try it for free HERE
Monday, June 26, 2017
Stocking the Pantry: Chicken and Wild Rice Casserole

Image from MyRecipes.com
24 boxes of Long Grain and Wild Rice (fast cooking or regular both work)
12 small packages of sliced almonds (I omit the almonds)
1.5 pounds of butter (store in the freezer)
24 celery ribs, sliced and dehydrated (or use fresh that you have on hand)
24 medium onions, diced and dehydrated (or use fresh that you have on hand)
24 cans of cream of mushroom soup or 12 of the large family size cans
12 cans of water chestnuts
To Have on Hand:
sour cream
shredded cheddar cheese
soft breadcrumbs
salt & pepper
milk
rotisserie chicken from the grocery store or whole roasted chicken
Sunday, June 25, 2017
Where do you school? designated room? or all over?
We are in full house upheaval as I rearrange pretty much every room in order to move our homeschooling downstairs. It will be my 14th year to homeschool this fall and I have finally given up on the idea of having my homeschool room upstairs in our loft. Over the years, we start off well upstairs, but eventually, life happens. You need to be able to fold laundry, watch a pot of stew, or scrub windows while children do independent work. Or you need little ones to stay with you at all times so that they don't draw pictures in sharpie decorate your walls or pour a gallon of vinegar into the volcano your middle school student made from plaster of Paris have science experimentation without supervision. It's not that I'm oblivious to the children, it's just that there is a lot to do when you have five children eating, sleeping, schooling, and making messes all day long in the house. In an effort to save my sanity teach the children good habits and responsible behaviors, we are reorganizing the entire house. My oldest, who commutes to college, moved into the downstairs bedroom leaving her larger upstairs room for the two younger girls. My boys share a room as well and I hope to make the loft a play room/craft room. I have really, missed having a good place to sew and having all of my sewing things in one place, rather than in every nook and cranny I can find throughout the house. So with that said, here are a few rooms that I like and are serving as inspiration.
 Has anyone else ever drooled over the thought of a library/dining room combo??? How perfect are those globes on the table?
Here is another from the Pennington Point. I just love her decorating style! I think that I would prefer a chalkboard but will likely just move the dry erase board from upstairs to downstairs since it would be FREE. I also have cubbies almost exactly like this setup.


Here is another from the Pennington Point. I just love her decorating style! I think that I would prefer a chalkboard but will likely just move the dry erase board from upstairs to downstairs since it would be FREE. I also have cubbies almost exactly like this setup.
My Child I Love You also has a classy way of combining her homeschool into the home living spaces. I want to find some pretty maps to hang on the wall and absolutely adore her alphabet idea.
What a fantastic way to organize the CC Memory Work as well.
When I get the books and school things all moved downstairs, then I will embark on the sewing loft. I have many ideas for organization, storage, and decoration pinned here. Since all children are either at work or in the barn, I will head back to my organizing fun and hope to post some photos of how my spaces turn out in the next several days. How do you like to organize your homeschool or crafting spaces?
Saturday, June 24, 2017
Stocking the Pantry #2 - Chicken Enchiladas
Stocking the Pantry: Chicken Enchiladas
I am working on gradually stocking my pantry with ingredients for dishes that make a regular rotation in our monthly meal plans. You can use store store-bought or homemade ingredients to make any of the recipes I am stocking in my pantry. I find that having some basics stocked up in the pantry makes it so much easier to eat at home, save money, and eat healthier. I hope this series helps you with your own pantry organization.
This grocery trip, will find me canning chicken and stocking up so that we can enjoy chicken enchiladas. Chicken enchiladas are really a favorite here. I have two recipes for them, but this is the recipe that is easiest to keep on hand. I won't stock up on the corn/flour tortillas as that is something that I buy regularly and keep on hand. If however, I happen to be out of tortillas, they are so easy to make with grains that I keep in bulk.
I will plan for chicken enchiladas to have them once per month. (this link is to a recipe that is very similar to mine, for those who like precise measurements.)
12 large cans of cream of chicken soup
12 cans green chilis
12 cans sliced black olives
12 pints of canned chicken (If canning your own, buy 48 small chicken breast halves)
1 large container of dehydrated onions
**Add 12 cans of cream of mushroom soup to have ingredients for King Ranch Chicken
To Have on Hand:
fresh green onions
fresh diced tomato
shredded cheddar cheese, Monterrey Jack or a combination of the two
sour cream
salsa
fresh cilantro (grows like a weed here in Central Texas)
salsa
fresh cilantro (grows like a weed here in Central Texas)
tortillas (Keeper of the Home has a recipe that I like to use when making them from scratch)
To make Chicken Enchiladas:
Combine equal parts of cream of chicken soup with sour cream. I use a large can or two small cans to make a 9x13 or a sheet pan of chicken enchiladas. I also stir in 1 small can of green chilis as well as some shredded cheese. When this is well blended, add in the cooked chicken. Fill tortillas with filling and roll. Lay them seam side down on the 9x13 or sheet pan. For an easy clean up, you can line the pan with foil. Once all tortillas are rolled, put the remaining filling over the top of the enchiladas. Top with shredded cheese and sliced black olives. Bake at 350* for 25-30 minutes. Serve with diced tomatoes, fresh cilantro, fresh green onions and salsa.
To make Chicken Enchiladas:
Combine equal parts of cream of chicken soup with sour cream. I use a large can or two small cans to make a 9x13 or a sheet pan of chicken enchiladas. I also stir in 1 small can of green chilis as well as some shredded cheese. When this is well blended, add in the cooked chicken. Fill tortillas with filling and roll. Lay them seam side down on the 9x13 or sheet pan. For an easy clean up, you can line the pan with foil. Once all tortillas are rolled, put the remaining filling over the top of the enchiladas. Top with shredded cheese and sliced black olives. Bake at 350* for 25-30 minutes. Serve with diced tomatoes, fresh cilantro, fresh green onions and salsa.
Tuesday, September 22, 2015
Bread, bread and more bread
I have been making my own bread for many years. However, I have never been able to duplicate a soft and fluffy loaf with mostly whole wheat flour. I can make the most fluffy bread imaginable with white flour, but the addition of wheat always produced a dense, heavy bread. This past month, I have finally found a little time to get back to baking my bread from scratch and I found this new recipe. It is absolutely the best bread recipe ever. It does use a small portion of white flour, but I am so willing to use the white flour and get such fabulous results. This recipe is best made in a Bosch mixer and makes 4 fluffy loaves. I will also link the recipe that I use for the dough enhancer. For my bread, I am grinding hard red wheat and having just as good of results as when I used hard white wheat before. I hope that if you are looking for the perfect bread recipe you will give this a try. If you don't need 4 loaves and also just want to use your bread machine, you might try the Oatmeal Honey Bread. It isn't wheat, but the wheat does add some whole grains and the taste is wonderful. I often put it in the bread machine before church or at the start of a school day for hot, fresh bread at lunch with minimal fuss.
Chef Brad's Basic Whole Wheat Bread
Dough Enhancer Recipe
Oatmeal Honey Bread for the Bread Machine (uses white flour)
Chef Brad's Basic Whole Wheat Bread
Dough Enhancer Recipe
Oatmeal Honey Bread for the Bread Machine (uses white flour)
Friday, July 24, 2015
Yummy Beef Enchiladas
Just a little review of a Pioneer Woman recipe I tried last night. I am no longer afraid to try homemade beef enchiladas! The sauce is easy and delicious! The enchiladas are fresh and delicious. I will add that I only used one can of green chilies since I have littles who don't care for things to be too spicy. This is one pinterest pin that did not disappoint!
One tip- use the 9 x 13 pan. I used a jelly roll pan because that is what I always use for my chicken enchiladas. These fit in the jelly roll pan, but as they cook and bubble the sauce also bubbles over and makes a mess of the oven.
Simple Perfect Enchiladas
One tip- use the 9 x 13 pan. I used a jelly roll pan because that is what I always use for my chicken enchiladas. These fit in the jelly roll pan, but as they cook and bubble the sauce also bubbles over and makes a mess of the oven.
Simple Perfect Enchiladas
Tuesday, June 23, 2015
A Patriotic Breakfast
Need a quick breakfast with unprocessed food? Want it to be colorful and patriotic too? How about healthy? Here is an answer to those breakfast needs... I'm sure it isn't unique to me, but it is what I had on hand for a quick and easy breakfast.
a dollop of plain greek yogurt
cut up red strawberries
a smidge of maple syrup or honey
another dollop of plain greek yogurt
a bit of chopped, fresh banana
another smidge of honey or maple syrup
last dollop of plain greek yogurt
topped with blueberries or blackberries
and drizzle on a little more maple syrup or honey
You can vary the layers with other treats like chopped crispy nuts or crunchy granola. My little A kept digging out her strawberries and Little C was quizzing me on how many seeds a blackberry has.... so it is an entertaining breakfast as well. I served it with a slice of whole grain toast and a glass of milk.
The Red, White, and Blue Parfait
In a half pint mason jar, layer....
a dollop of plain greek yogurt
cut up red strawberries
a smidge of maple syrup or honey
another dollop of plain greek yogurt
a bit of chopped, fresh banana
another smidge of honey or maple syrup
last dollop of plain greek yogurt
topped with blueberries or blackberries
and drizzle on a little more maple syrup or honey
You can vary the layers with other treats like chopped crispy nuts or crunchy granola. My little A kept digging out her strawberries and Little C was quizzing me on how many seeds a blackberry has.... so it is an entertaining breakfast as well. I served it with a slice of whole grain toast and a glass of milk.
Friday, June 12, 2015
A simple menu plan for a busy season
We just arrived home from the full week at the Texas 4-H Roundup and now are moving into another busy week. It is the week of the 4-H Recordbook. I have 3 kids working on recordbooks and did not need any sort of complicated meals. This is my plan. It is both frugal and simple.
Friday:
Breakfast- instant oatmeal
Lunch- sandwiches, chips, fruit
Dinner- spaghetti with meat sauce, rosemary garlic bread, salad from the garden, green beans
Saturday:
Breakfast:Eggs, Sausage, Toast
Lunch: 7 layer Tostadas, rice, fruit coctail
Dinner: Taco Soup in the crockpot, tortillas, shredded cheese, sour cream, and avocado
Sunday
Breakfast:Boxed Cereal with milk (no judging...it's hard enough to get to church)
Lunch: Roast Beef with carrots, potatoes, green beans, and bread
Dinner: Leftovers
Monday
Breakfast: Oatmeal with butter, sausages
Lunch: Easy Chicken Pot Pie
Dinner: Ham and Scallop Potatoes
Tuesday
Breakfast: Scrambled eggs on tortillas
Lunch: Salmon Patty, peas, raw veggies and ranch
Dinner: Beef and Barley Soup, Bread in bread machine
Wednesday
Breakfast:Pancakes
Lunch:Grilled Chicken on Caesar Salad (buy the kit and add grilled chicken)
Dinner: Meatloaf, mashed potatoes, green beans, squash from the garden
Thursday
Breakfast:Scones and eggs
Lunch: Grilled Cheese and Vegetable Soup (from Sue Gregg's lunch book)
Dinner: Sloppy Joes, chips, apple slices
Friday
Breakfast: Breakfast tacos
Lunch: Pizza and salad
Dinner: Eating out
Friday:
Breakfast- instant oatmeal
Lunch- sandwiches, chips, fruit
Dinner- spaghetti with meat sauce, rosemary garlic bread, salad from the garden, green beans
Saturday:
Breakfast:Eggs, Sausage, Toast
Lunch: 7 layer Tostadas, rice, fruit coctail
Dinner: Taco Soup in the crockpot, tortillas, shredded cheese, sour cream, and avocado
Sunday
Breakfast:Boxed Cereal with milk (no judging...it's hard enough to get to church)
Lunch: Roast Beef with carrots, potatoes, green beans, and bread
Dinner: Leftovers
Monday
Breakfast: Oatmeal with butter, sausages
Lunch: Easy Chicken Pot Pie
Dinner: Ham and Scallop Potatoes
Tuesday
Breakfast: Scrambled eggs on tortillas
Lunch: Salmon Patty, peas, raw veggies and ranch
Dinner: Beef and Barley Soup, Bread in bread machine
Wednesday
Breakfast:Pancakes
Lunch:Grilled Chicken on Caesar Salad (buy the kit and add grilled chicken)
Dinner: Meatloaf, mashed potatoes, green beans, squash from the garden
Thursday
Breakfast:Scones and eggs
Lunch: Grilled Cheese and Vegetable Soup (from Sue Gregg's lunch book)
Dinner: Sloppy Joes, chips, apple slices
Friday
Breakfast: Breakfast tacos
Lunch: Pizza and salad
Dinner: Eating out
Subscribe to:
Posts (Atom)


